How to Roll a Joint: A Comprehensive Guide to smoke Cannabis
Content Topics: How to Roll a Joint: A Comprehensive Guide to smoke Cannabis
This guide is intended for informational purposes only and does not endorse or promote the use of illegal substances. Cannabis remains illegal in many jurisdictions. Please be aware of and comply with all local laws and regulations regarding cannabis.
How to Roll a Perfect Joint Rolling Technique?
Rolling a joint is a time-honored skill, an art form for many cannabis enthusiasts. More than just a way to consume cannabis, a well-rolled joint is a statement of craftsmanship, promising an even burn, a smooth draw, and a delightful experience. While pre-rolls are readily available, there’s a unique satisfaction that comes from grinding your own herb, carefully constructing your creation, and enjoying the fruits of your labor.
This comprehensive guide will walk you through every step of the joint-rolling process, from selecting your materials to perfecting your technique. Whether you’re a complete novice or looking to refine your existing skills, prepare to unlock the secrets to a perfect joint every time.
I. The Essential Toolkit: Gathering Your Supplies
Before you embark on your rolling journey, ensure you have all the necessary components. Having everything laid out and ready will streamline the process and prevent frustrating interruptions.
1. Your Herb (Cannabis): The Star of the Show
- Quality Matters: The quality of your cannabis significantly impacts the rolling experience and the final product. Well-cured, properly dried flower is easier to grind and burns more evenly. Avoid overly wet or crumbly cannabis, as it can be challenging to work with.
- Strain Selection: Consider the strain you’re using. Denser nugs might require a bit more effort to grind, while fluffier strains can be easier to break down.
- Quantity: For a standard joint, you’ll typically use between 0.5 and 1 gram of cannabis, depending on your preferred size and the capacity of your rolling paper.
2. Grinder: The Key to Consistency
- Why Grind? Grinding your cannabis is crucial for several reasons:
- Even Burn: A consistent grind ensures that your cannabis burns evenly, preventing “canoeing” (where one side burns faster than the other).
- Maximized Surface Area: Grinding increases the surface area of your cannabis, allowing for better airflow and a smoother, more flavorful draw.
- Easier Rolling: Uniformly ground cannabis is far easier to distribute and shape within your rolling paper.
- Types of Grinders:
- Two-Piece Grinders: Simple and effective, these consist of two halves with teeth that grind the herb when twisted.
- Four-Piece Grinders (with Kief Catcher): These are the most popular. They have a grinding chamber, a collection chamber for the ground herb, and a screen that sifts out kief (potent cannabis trichomes) into a separate lower compartment. This is a great option for collecting concentrated goodness.
- Manual Grinders: Smaller, more portable options that you twist by hand.
- Electric Grinders: While less common for cannabis, these can offer a very fine and consistent grind with minimal effort.
- Grind Consistency: Aim for a medium-fine, fluffy consistency. Avoid grinding too finely, as it can restrict airflow and make your joint difficult to pull from. Conversely, a too-coarse grind can lead to an uneven burn and wasted product.
3. Rolling Papers: Your Canvas
- Size: Rolling papers come in various sizes:
- Single Wide: The smallest, good for quick, personal smokes.
- 1 ¼ (One and a Quarter): The most common and versatile size, perfect for a standard joint.
- 1 ½ (One and a Half): Wider than 1 ¼, allowing for a fatter joint.
- King Size: The largest, ideal for sharing or longer smoking sessions.
- King Slim: King size but narrower, offering a longer, thinner joint.
- Material:
- Rice Papers: Thin, slow-burning, and produce minimal ash. They can be a bit delicate to work with.
- Hemp Papers: A popular eco-friendly option, offering a medium burn rate and a slightly earthy taste.
- Wood Pulp Papers: The original and most common type, offering a consistent burn and a neutral taste.
- Transparent/Cellulose Papers: Made from plant cellulose, they burn very slowly and are visually appealing, but can sometimes have a slightly plastic-like taste.
- Gumline: All rolling papers have a gummed edge (usually made from natural gum arabic) that you moisten to seal the joint. Ensure the gumline is intact and sticky.
- Brand Preference: Experiment with different brands to find what you prefer. Popular brands include RAW, Rizla, OCB, and Elements.
4. Filter/Crutch/Roach Tip: The Foundation
- Purpose: A filter (also known as a crutch or roach tip) serves several important functions:
- Structural Integrity: Provides a solid base for your joint, making it easier to hold and preventing it from collapsing.
- Prevents Scooby Snacks: Stops small bits of cannabis from entering your mouth.
- Improved Airflow: Creates a consistent draw and prevents resin buildup at the mouthpiece.
- No Waste: Allows you to smoke the entire joint without burning your fingers or lips.
- Materials:
- Pre-made Filters: Many rolling paper brands offer pre-rolled or perforated filter tips, often made from cardboard or thick paper. These are convenient and consistent.
- DIY Filters: You can easily make your own from a business card, a rolling paper pack, or any unbleached, non-glossy cardstock.
- Shape: Filters can be rolled into a simple cylinder, an “M” shape, or a spiral. The “M” shape is popular as it creates multiple channels for airflow.
5. Packing Tool (Optional but Recommended): For Precision
- What to Use: A poker, dab tool, a straightened paper clip, the end of a pen, or even a chopstick can be used.
- Purpose: Helps to gently pack down the cannabis inside the joint, ensuring an even density and a smooth burn.
6. Rolling Tray (Optional): Keeping it Clean
- Benefits: A rolling tray provides a designated, clean surface for rolling, catching any spilled herb and making cleanup easier. Many trays have compartments for your grinder, papers, and filters.
II. The Preparation: Setting the Stage for Success
With your toolkit assembled, it’s time to prepare your materials for the main event.
1. Grind Your Cannabis:
- Place your desired amount of cannabis into your grinder.
- Twist the grinder firmly until all the herb has passed through the teeth and into the collection chamber.
- If using a four-piece grinder, give it a few extra twists and taps to help separate the kief.
- Open the grinder and gently transfer your fluffy, ground cannabis onto your rolling tray or a clean surface. Ensure there are no large stems or seeds.
2. Prepare Your Filter:
- Pre-made Filter: If using a pre-made filter, simply remove it from its packaging.
- DIY Filter:
- Tear off a rectangular strip of cardstock (about ½ inch wide and 1 ½ inches long).
- For an “M” filter: Fold the first ¼ inch of one end of the strip into a tight accordion-style “M” shape. Then, roll the remaining paper tightly around the “M” to form a cylinder.
- For a simple cylinder: Simply roll the strip tightly into a cylinder.
- Set your prepared filter aside.
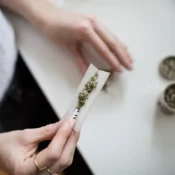
III. The Art of Rolling: Step-by-Step
This is where the magic happens. Practice makes perfect, so don’t get discouraged if your first few attempts aren’t flawless.
1. Hold the Paper:
- Take a rolling paper and hold it with the gummed edge facing upwards and towards you.
- The crease in the middle of the paper will act as your guide.
2. Insert the Filter:
- Place your prepared filter at one end of the rolling paper, aligning it with the bottom edge of the paper. It should rest securely at the desired width of your joint.
- Most people place the filter on the dominant hand side (right side for right-handers), but experiment to see what feels most comfortable.
3. Distribute the Cannabis:
- Carefully sprinkle your ground cannabis evenly along the length of the paper, from the filter to the opposite end.
- Aim for a slightly tapered shape, with more cannabis in the middle and less at the ends. This helps create an even burn and a conical shape (if desired).
- Don’t overfill the paper, but ensure there’s enough herb to create a satisfying joint.
4. Shape and Pack (The Cradle):
- This is the most crucial step. Use your thumbs and index fingers to gently pinch and roll the paper back and forth, shaping the cannabis into a cylindrical or conical form.
- As you roll, the cannabis will begin to compact and take the shape of the joint.
- Focus on creating an even density throughout. The filter should provide a firm base, and the cannabis should be snug against it.
- Think of it like rocking a baby in a cradle – a gentle, rhythmic motion.
5. Tuck and Roll (The Seal):
- Once you have a well-formed cylinder of cannabis, it’s time to tuck the un-gummed edge of the paper underneath the cannabis.
- Starting from the filter end, use your thumbs to tuck the lower edge of the paper in and around the cannabis, guiding it under the upper, gummed edge.
- This can be challenging initially. If you’re struggling, try tucking the paper around the filter first, as it provides a solid anchor.
- Once tucked, continue rolling the joint upwards, allowing the gummed edge to become the top layer.
6. Lick and Seal:
- Moisten the gummed edge with your tongue from one end to the other. Just enough to make it sticky, but not so much that it becomes soggy.
- Carefully press the gummed edge down onto the rolled paper, sealing the joint. Ensure a firm and even seal along the entire length.
- Run your finger along the seam to ensure it’s tightly sealed and no cannabis can escape.
7. Pack and Finish:
- Hold the joint vertically, with the filter end down.
- Gently tap the filter end on a hard surface a few times. This helps to settle the cannabis and ensure a more even pack.
- Use your packing tool to gently push down any loose cannabis at the open end of the joint. Be careful not to pack it too tightly, as this will restrict airflow.
- For a cleaner finish and to prevent loose herb from falling out, you can twist the open end of the paper to create a “pigtail” or simply fold it down. Some prefer to just leave it open for easier lighting.
IV. Troubleshooting Common Rolling Issues
Don’t despair if your first few joints aren’t perfect. Even experienced rollers have off days. Here are some common problems and how to address them:
- The Joint is Too Loose:
- Problem: Air pockets, uneven burn, cannabis falling out.
- Solution: You didn’t pack enough cannabis, or you didn’t roll it tightly enough during the “shape and pack” stage. Ensure you’re really forming a firm cylinder before tucking.
- The Joint is Too Tight:
- Problem: Difficult to draw from, poor airflow, harsh smoke.
- Solution: You either used too much cannabis or packed it down too hard. Aim for a firm but not rock-hard consistency. Use your packing tool gently.
- Canoeing (One Side Burns Faster):
- Problem: Uneven distribution of cannabis, or a loose spot.
- Solution: Focus on even distribution during the initial sprinkle. Ensure consistent density when shaping and packing. If you notice it happening during smoking, gently wet the fast-burning side with saliva to slow it down.
- The Joint Keeps Unrolling:
- Problem: Insufficient moisture on the gumline, or not pressing firmly enough.
- Solution: Ensure you’re moistening the entire gumline. Press firmly and evenly along the seam after licking.
- Scooby Snacks (Bits of Herb in Your Mouth):
- Problem: No filter, or a poorly made filter.
- Solution: Always use a filter! If you are, ensure it’s tightly rolled and doesn’t have large gaps.
- Difficulty Tucking the Paper:
- Problem: Lack of dexterity, or overfilling the paper.
- Solution: Practice, practice, practice! Start by focusing on tucking around the filter first, as it provides a solid anchor. Don’t be afraid to empty and restart if it’s not going well. Try using less cannabis for your initial attempts.
V. Enhancing Your Rolling Game: Advanced Tips
Once you’ve mastered the basics, consider these tips to elevate your joint-rolling prowess:
- Backrolling/Reverse Rolling: This advanced technique involves tucking the paper from the opposite side and then tearing off the excess paper, resulting in a cleaner look and less paper smoke. It takes practice but is highly rewarding.
- Cones vs. Cylinders: While a cylindrical joint is standard, many prefer a conical shape (wider at the lighting end, tapering down to the filter). This promotes a better burn and allows for a larger initial hit. Achieve this by distributing more cannabis at the wider end.
- The “W” or “M” Filter: As mentioned earlier, this filter shape creates multiple airflow channels, providing a smoother draw and preventing clogging.
- Using a Rolling Machine: If manual rolling proves too challenging or you need speed and consistency, a rolling machine can be a great investment. They produce perfectly rolled joints with minimal effort.
- Flavored Papers: Experiment with flavored rolling papers for a different taste experience, though purists often prefer unflavored papers to fully appreciate the cannabis terpenes.
- Infusing Your Joint: For an extra kick, consider adding kief, hash, or cannabis concentrates (like wax or shatter) to your ground flower. Be mindful not to overdo it, as this can affect burn consistency.
- Practice with Herbs: If you’re nervous about wasting cannabis, practice your rolling technique with a substitute like dried herbs (e.g., oregano, basil) or tobacco.
Conclusion
Rolling a joint is a meditative process, a skill that improves with dedication and practice. It’s about more than just putting cannabis into paper; it’s about understanding the nuances of your materials, honing your dexterity, and creating a perfectly engineered smoking experience.
Remember to be patient with yourself, embrace the learning curve, and most importantly, enjoy the journey. With this comprehensive guide and a little perseverance, you’re well on your way to becoming a joint-rolling master, ready to impress your friends and savor the fruits of your finely crafted creations. Happy rolling!
References Information and Images:
- Image for this article: Unsplash website (unsplash.com)